Bricks come in a wide variety of sizes, shapes, and textures. Understanding specifications and dimensions is important for laying bricks properly.
A basic tool set for bricklaying includes pointed trowels, bolster chisels, and lump hammers. A spirit level and a tape measure are also necessary. A basic knowledge of brick patterns is also helpful. Visit Website to learn more.
If you’ve decided to tackle a brick-laying project, you must prepare for the work at hand. This is a complex process that requires careful planning and execution to achieve the desired results. This preparation includes determining the type of brick you will use, conducting soil analysis to ensure the area is suitable for the structure and mixing mortar to the correct consistency. It’s also a good idea to have all of the required tools on hand or rent them, as many brick laying jobs require specialized equipment.
First, dig a trench that is at least a foot deep and wide for your brick wall. This is your foundation and will support the rest of your construction. The soil should be tested to determine if it will hold a brick wall, and if not, you may need to pour a concrete slab or footing. It’s a good idea to do this before you begin laying bricks, as it can save time and money in the long run.
Mix your mortar, or masonry cement, to the proper consistency on an old board. The mixture should be smooth enough to slide off your trowel, but not too wet or you will have problems getting the bricks to bond correctly. This step can be done using a wheelbarrow, or you can use a mortar mixer for larger projects. Typically, three parts sand and one part masonry cement are used, with water added to make the mixture damp.
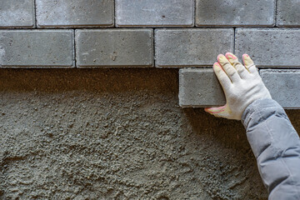
Butter up the end (or ‘header’ face) of your first brick with mortar, then set it into position on the mortar bed. Press it down gently, checking it with your string line and level for straightness. Scrape any excess mortar away and wipe up any wet brick dust.
Once the first course of bricks are down, you can clamp or nail a piece of string between your guide posts to act as your guide for each subsequent row of brick. This will help you keep your walls even and at the correct height.
Before you begin laying your next course, use mortar to butter up the end of another brick and place it into place on the wall. Once again, check it with your guideline and level for straightness, and scrape any excess mortar away before it sets.
Brick laying is a skilled trade that requires dedication, practice and knowledge of the proper techniques. It is also essential to have the right tools and know-how. Whether you are building a brick mailbox enclosure or a brick home, the process is the same. You will need to apply a generous amount of mortar to the foundation row, set each brick firmly and then tap it gently with a trowel handle to ensure good adhesion.
It is important to use a high-quality cement mix that includes the correct proportions of cement, sand and water. This will give you a strong and durable finished product that can stand up to weathering and other environmental factors. Ensure that you have enough of this mixture to complete the project and always buy 10-15 more bricks than you need as some will break during construction.
To lay the first course of bricks, you will need a mason’s line, which should be attached to the end bricks on either side of your wall to mark the desired height of your first layer. You will then need to lay a row of bricks along this line. Once you have completed this, check the level of the first row with a spirit level and make any necessary adjustments.
As you work, remember to butter each new brick, which will help it bond with the mortar. If you are having difficulty with a particular brick, consider using a brick bolster and a bolster chisel to split the brick in half, making it easier to lay. If you have to cut a brick, it is best to do this on the back of the block and not on the face as this can cause damage.
Once you have laid the first row of bricks, move your guideline up to the next marker, which should be at a half-brick higher than the previous row. This will help avoid the joints in each row lining up, which can result in weak and unstable brickwork.
Once you have mastered the basics of bricklaying, it will become much easier to get your projects done. If you want to learn this skill, consider taking courses at a local college or even finding a job as a bricklayer to gain on-the-job experience.
If the foundation you are working on is not a concrete one, you will need to add mortar to it to allow you to build the brick wall. This is usually a cement mix that has been watered down to a runny consistency. Add the mortar to the brick laying surface and spread it with your trowel. Make sure that the surface is smooth and level, but don’t use too much mortar or it will be too hard to work with.
A mason’s line is a great tool for helping to keep your brick wall straight as you lay it up. You can tie the line to two adjacent bricks and pull it tight to create a guideline that you will follow as you complete the wall. You can also use a tape measure to mark a line on the ground where you wish your wall to be built. After a couple of rows have been completed, check the line with a level to make sure that it is even.
The first brick in your brick wall should be buttered, and then pressed lightly into place. Make sure that it is a full brick, and that it is positioned at the proper height in the wall. A level will help you to be sure that it is even with the bottom of the wall, and a string gauging line can also be used to help create a straight guideline.
You should stagger your bricks for each course of the wall, if it is a taller structure. This will help to prevent the formation of a weakness in the wall. This can be done by starting each row with a full brick and then using half bricks for the rest of the course.
Some bricks may need to be cut in order to be placed properly. This is generally done with a chisel and a lump hammer, although a bolster chisel can be used as well. This will require a lot of practice, but if you are careful it can be done fairly easily.
Bricks are made from soil which must be separated from impurities and then exposed to the elements for a period of time to make it durable enough to become a brick. Once the soil has been weathered it can be mixed with other ingredients to form a brick suitable for building. Once a brick has been formed it must be left to dry before it can be used. When this is done it is called tempering and is a vital step to ensuring that the brick will be able to hold up well to structural pressures.
A brick must also be sanded down to create a smooth surface and then coated in a waterproofing material before it can be used for construction. When a brick is used for construction it must be placed in the correct position and must always be laid with its frog (indentation) facing up. This will ensure that it is fully bonded with the bricks below and above.
The first course of bricks in a wall is called the foundation and it is important to get this right to ensure a strong structure. It is a good idea to use guide bricks at either end of the footing and stretch a string line between them to act as a guide for the rest of the foundation. A timber board driven into the ground on each side can also be used as a guide to help keep a straight line when laying the first few courses.
To prepare the foundation it is necessary to mix some masonry cement, known as mortar. This can be done in a wheelbarrow for small projects or a cement mixer for larger jobs. The mortar should be a consistency which is easy to work with but not so wet that it oozes out of the joints or takes ages to set. This is a skill which comes with practice and will become easier as you gain experience.
Once the foundation has been laid it is time to start constructing the walls. It is a good idea to place a spirit level on the first course of bricks and tap down any that are out of position with the end of your trowel. It is easier to do this at this stage rather than trying to redo a whole row later on.